Arduino UNO R3
Getting Started Guide
From unboxing to uploading your first program. Covers DIP & SMD variants, CH340 & FT232R chipsets, all platforms including Android, plus complete troubleshooting.
Prefer to watch instead of read?
These community videos walk through the same setup process.
Community videos. Tishvi is not affiliated with creators.
Identify Your Board Variant (DIP vs SMD)
Both versions work identically — the only difference is how the main chip is mounted.
The easiest way to tell them apart: check the product title or listing where you purchased — it will say "DIP" or "SMD." You can also look at the board itself as shown below.
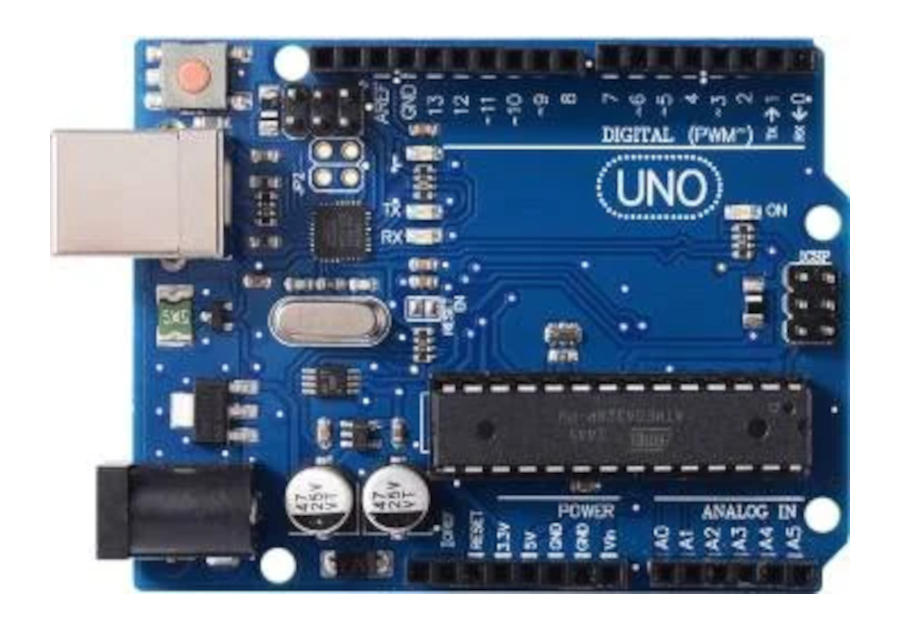
- Listed as "UNO R3 DIP" in your order
- Main chip is a tall, rectangular black block sitting in a socket — it has metal legs on both sides (like a centipede)
- The chip can physically be pulled out of its socket
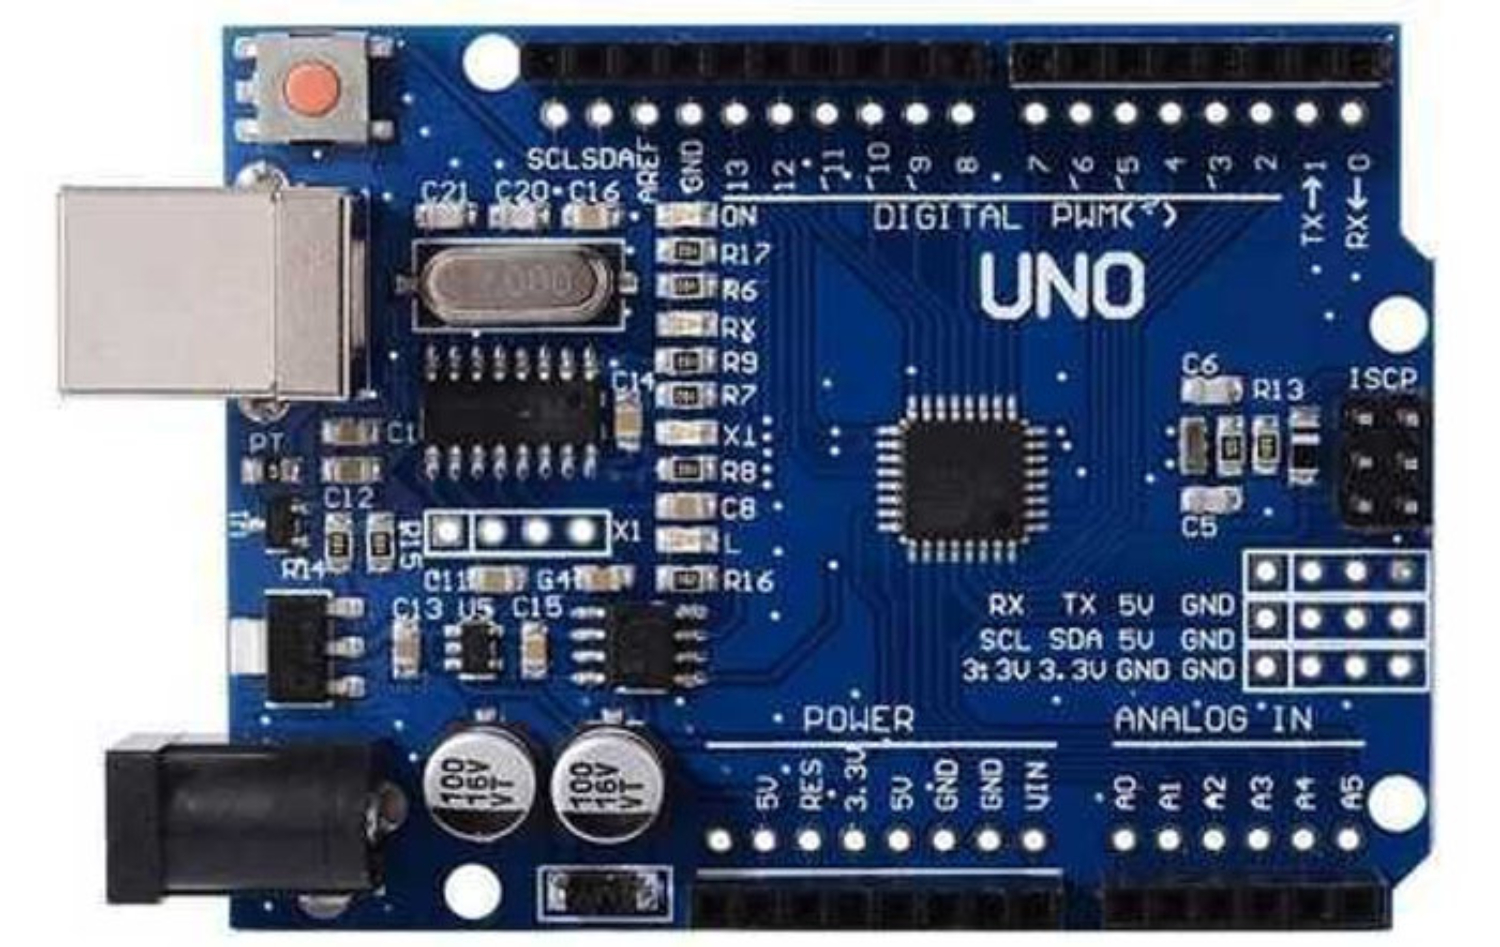
- Listed as "UNO R3 SMD" in your order
- Main chip is a flat square soldered flush to the board — no visible legs sticking out
- The chip cannot be removed — it is permanently soldered
Find Out Which USB Chip Your Board Uses
This tells you which driver to install — takes 30 seconds to check.
Your UNO R3 has a small chip that lets it talk to your computer over USB. There are two types used in Tishvi boards — CH340 and FT232R. They need different drivers, so you need to know which one you have.
The easiest way to find out: check the product title or description on your Amazon order, or any label/sticker on the box. It will usually mention "CH340" or "FT232".
Install the USB Driver
Select your chipset first, then your OS for exact steps.
Step A — Choose your chipset:
Step B — Choose your OS:
Download CH341SER.EXE
Go to wch-ic.com → and download CH341SER.EXE — the official Windows installer from the chip manufacturer (WCH).
Run as Administrator
Right-click CH341SER.EXE → "Run as administrator" → click Yes on the Windows security prompt.
Click INSTALL in the driver window
In the setup window, click INSTALL. Wait a few seconds for "Driver Install Success!"
Plug in board and verify in Device Manager
Now plug in your board. Open Device Manager (right-click Start → Device Manager). Expand Ports (COM & LPT) → you should see "USB-SERIAL CH340 (COMx)". Note this COM number — you'll need it in Step 6.
Download CH341SER_MAC.ZIP
Go to wch-ic.com →. Download and extract the ZIP file.
Run the .pkg installer
Double-click CH34xVCPDriver.pkg inside the extracted folder. Click Continue → Install, enter your Mac password → Install Software.
Allow System Extension in Privacy & Security
Go to System Settings → Privacy & Security → scroll down to find a blocked software message about "wch.cn" or "CH340" → click Allow.
Restart Mac, then verify
After restart, plug in your board. Open Terminal and type: ls /dev/cu.*. You should see /dev/cu.wchusbserial or similar — that's your board's port.
Plug in and verify detection
Open a terminal and run: ls /dev/ttyUSB*. You should see /dev/ttyUSB0. Also try: dmesg | grep -i ch34 to see the kernel recognition message.
Raspberry Pi: Same steps apply — CH340 is supported in Raspberry Pi OS (Raspbian) out of the box.
Add yourself to the dialout group
Run: sudo usermod -a -G dialout $USER
Then log out and back in (or restart). This gives upload permission without needing sudo each time.
groups $USER — "dialout" should appear in the list.Raspberry Pi — install Arduino IDE
Run: sudo apt-get update && sudo apt-get install arduino — or download the Linux ARM 32/64-bit build from arduino.cc/en/software. The AppImage version works well on Pi 4/5.
Get a USB OTG adapter
You need a USB OTG (On-The-Go) adapter matching your phone's port: USB-C to USB-A, or Micro-USB to USB-A. Plug the OTG adapter into your phone, then connect the UNO R3's USB-B cable to the OTG adapter. Confirm your phone supports OTG (check specs — most phones from 2016+ do).
Option A (Free): Serial Monitor only
Install Serial USB Terminal by Kai Morich from Google Play (free). Open the app → grant USB permissions → tap the connect button (plug icon). Set baud rate to 9600. If you see data scrolling from your board, everything is working. You can use this to debug sketches already uploaded via a computer.
Option B (Paid): Full IDE — ArduinoDroid
Install ArduinoDroid from the Play Store (~$4 USD). This bundles its own compiler — on first launch it downloads toolchain (~300MB on Wi-Fi). Then: open or write a sketch → select board "Arduino Uno" → plug in board via OTG → tap Upload. Sketch is compiled and uploaded entirely from your phone. No PC required.
If board isn't recognized on Android
In Serial USB Terminal: tap ≡ menu → USB Driver → try different driver options (CH340, CDC, FTDI) until the connection succeeds. Also ensure phone's USB mode is set to "OTG" or "Host" in Settings if it asks.
Connect Your Board
Plug in the USB cable and confirm the board powers on correctly.
Use the correct cable
Use the USB-A to USB-B cable included with your board. The USB-B end has a square-ish connector that plugs into the board. Some cheap USB cables are charge-only (2 wires inside) — use a data cable. The one in the box is always correct.
Check the indicator lights when connected
When plugged in, your board has small LED indicator lights near the USB port. Their exact color may vary between board models (some boards have blue/red, others have green/orange) — what matters is whether they light up:
| LED Label | What it means |
|---|---|
| PWR or ON | Power LED — lights up immediately when plugged in. Must be ON. If it doesn't light, try a different USB port or cable. |
| L (Pin 13) | Built-in LED — may blink if a test sketch is pre-loaded. This is normal. |
| TX | Transmit LED — blinks rapidly during sketch upload (data going to board) |
| RX | Receive LED — blinks rapidly during sketch upload (data coming from board) |
Install Arduino IDE
The free, official program for writing and uploading code to your board.
Download Arduino IDE 2 (free)
Go to arduino.cc/en/software → and download for your platform. Always download Arduino IDE 2.x (latest version).
Install on your platform
Windows: Run the .exe installer → accept all defaults.
macOS: Open the .dmg → drag Arduino IDE to Applications. If macOS says "unidentified developer" → right-click the app → Open.
Linux: Download the .AppImage → right-click → Properties → Permissions → check "Allow executing as program." Then double-click to launch. Alternatively use the .zip → run install.sh.
Raspberry Pi: Run sudo apt-get install arduino or download the Linux ARM 32-bit AppImage.
Launch Arduino IDE
Open from Start Menu (Windows), Applications (macOS), or terminal (Linux). First launch may take 30–60 seconds indexing libraries. When you see the editor with a blank sketch — you're ready.
Android — ArduinoDroid app (no PC needed)
If you're uploading sketches directly from an Android phone, you do not need Arduino IDE installed on a computer. Instead use the ArduinoDroid app:
- Install ArduinoDroid from the Google Play Store (~₹350 / ~$4 USD one-time). This is a full Arduino IDE port for Android with a built-in compiler.
- On first launch, ArduinoDroid will download the compiler toolchain (~300 MB) — do this on Wi-Fi.
- Connect your board via a USB OTG adapter (USB-C to USB-A, or Micro-USB to USB-A). ArduinoDroid will request permission to access the USB device — tap Allow.
- Open or write your sketch → tap the Board selector → choose Arduino Uno → tap Upload ↑.
Configure Arduino IDE
Tell the IDE which board you have and which port it's on.
Select Board Type
Menu: Tools → Board → Arduino AVR Boards → Arduino Uno. It must say "Arduino Uno" — not Mega, Nano, or Leonardo.
Select the Port
Go to Tools → Port and select your board's port:
| OS | Port looks like | How to identify |
|---|---|---|
| 🪟 Windows | COM3 (Arduino Uno) | Unplug → note ports → replug → new port = your board |
| 🍎 macOS | /dev/cu.wchusbserial140 | Run ls /dev/cu.* before & after plugging in |
| 🐧 Linux | /dev/ttyUSB0 | Run ls /dev/ttyUSB* before & after plugging in |
| 🤖 Android | No port — app handles connection directly | In ArduinoDroid or Serial USB Terminal, tap the plug icon — the app opens the USB device automatically |
Upload Your First Sketch — Blink!
The "Hello World" of electronics. Confirms everything is working end-to-end.
Open Blink example
In Arduino IDE: File → Examples → 01.Basics → Blink. A new editor window opens with the complete code.
Read the code — here's what it means
// Blink — the "Hello World" of Arduino
// Turns the built-in LED on for 1 second, then off for 1 second

// ── setup() runs ONCE when the board first powers on ─────────
void setup() {
  // LED_BUILTIN is a shortcut for pin 13 (the on-board LED)
  pinMode(LED_BUILTIN, OUTPUT);    // Set pin 13 as an output
}

// ── loop() repeats FOREVER after setup() finishes ────────────
void loop() {
  digitalWrite(LED_BUILTIN, HIGH);  // Turn LED ON  (5V on pin 13)
  delay(1000);                       // Wait 1000ms = 1 second
  digitalWrite(LED_BUILTIN, LOW);   // Turn LED OFF (0V on pin 13)
  delay(1000);                       // Wait 1 second
}                                    // Back to top of loop()
Upload the sketch
Click the Upload → button (right-arrow in toolbar) or press Ctrl+U (Win/Linux) / Cmd+U (Mac). You'll see:
- Status bar: "Compiling sketch…" (takes ~5–15 seconds)
- TX/RX LEDs on board blink rapidly during upload transfer
- Status bar: "Done uploading." ✅
Watch the L LED blink 🎉
The orange L LED on your board blinks: 1 second ON, 1 second OFF. If you see this — your board is fully working!
Change both 1000 values to 100 — re-upload and watch the LED blink 10× faster.
void loop() {
  digitalWrite(LED_BUILTIN, HIGH);
  delay(100);  // 0.1 second
  digitalWrite(LED_BUILTIN, LOW);
  delay(100);  // 0.1 second
}
Common Errors & Their Fixes
Find your exact error message and follow the solution.
- Confirm your chipset (Step 2) and install the correct driver for your OS (Step 3).
- Replace USB cable — use a known data-capable cable.
- Try a different USB port (prefer USB 2.0 over USB 3.0 — some 3.0 ports have timing issues with CH340).
- Windows: Device Manager → look for Unknown Device with ⚠️ → right-click → Update Driver → Browse → point to CH341SER or FTDI folder.
- Restart your computer after driver installation, especially on macOS.
- Verify Tools → Board = Arduino Uno (not Mega, Nano, etc.).
- Verify Tools → Port = your board's COM port.
- Close any Serial Monitor windows before uploading — they lock the port.
- Try pressing the Reset button on the board about 1–2 seconds before clicking Upload, then release it right as you click Upload.
- Windows: If port is COM10 or higher, Device Manager → right-click port → Properties → Port Settings → Advanced → change port number to COM3–COM9.
- Close Serial Monitor if open.
- Close PuTTY, Serial USB Terminal, or any other app using the same port.
- Unplug board → replug → try Upload again.
- Try pressing Reset on the board precisely when the status changes from "Compiling sketch…" to "Uploading…"
- Try a slower upload speed: Tools → Processor → ATmega328P (Old Bootloader).
- Right-click the Unknown Device → Uninstall device → check "Delete the driver software for this device" → Uninstall.
- Unplug board.
- Install correct CH340 or FTDI driver from Step 3.
- Replug board — now shows as correct COM port.
- System Settings → Privacy & Security → look for blocked software from "wch.cn" or "FTDI" → Allow.
- Restart Mac after clicking Allow.
- Check no other app (Serial Monitor, other IDE) has the port open.
- In rare cases on Ventura/Sonoma: open Terminal →
sudo chmod 666 /dev/cu.wchusbserial*as a temporary fix.
- Run:
sudo usermod -a -G dialout $USER - Log out and back in (must fully re-login, not just reload terminal).
- Verify:
groups $USER— "dialout" should appear. - Check ownership:
ls -la /dev/ttyUSB0— should show group "dialout". - Temporary bypass (while fixing):
sudo arduino-ide
- Verify your phone supports USB OTG — search "[phone model] USB OTG support."
- Try a different OTG adapter — cheap adapters fail often.
- Check phone USB settings: Settings → USB (or Connections → USB) → select "OTG" or "File Transfer" mode.
- In Serial USB Terminal: ≡ menu → USB Driver → try all options (CH340, CDC, FTDI) one by one until connection succeeds.
- Some phones require a USB power source on the OTG adapter to work — try a powered OTG hub.
- Try uploading anyway — this warning often doesn't block programming.
- If uploads fail: download FT_PROG from ftdichip.com → scan device → Restore Factory Defaults → Program.
- If chip is still unresponsive, contact Tishvi support with your order number — this may be a warranty issue.
- Press the Reset button — restarts the loaded sketch from the beginning.
- If no response after Reset, upload the Blink sketch from Step 7.
- If no COM port shows despite PWR LED, the issue is the driver — not the board. Revisit Step 3.
- Unplug immediately if the board feels hot.
- Disconnect all wires, sensors, and shields.
- Plug in with USB only — no connections. If it works now, one of your external components caused a short.
- Check that no wires accidentally bridge 5V to GND, or feed voltage into an I/O pin that's set as OUTPUT.
- If hot with nothing connected and no COM port → hardware defect. Contact Tishvi support.
- In IDE: Tools → Board → Board Manager → search for "Arduino AVR Boards" → install or reinstall it.
- After install, restart the IDE.
- Re-select Tools → Board → Arduino Uno and try uploading again.
- Device Manager → Ports → right-click CH340/FTDI port → Properties → Power Management tab → uncheck "Allow the computer to turn off this device to save power."
- Try a different USB port, or connect via a powered USB hub.
- If using a laptop, plug in AC power — some laptops aggressively power-save USB ports on battery.
Troubleshooting Checklist
Run through every item before contacting support — this resolves 95% of issues.
Frequently Asked Questions
Common questions from first-time users.
Serial.begin(9600); in setup(), then Serial.println("Hello!"); anywhere in your code. Upload, then click the magnifying glass icon (top-right of IDE) to open Serial Monitor. You'll see text from your board in real-time. This is the primary debugging tool for Arduino beginners.pip install pyfirmata and write Python code that controls pins in real-time. You can also just use Python + pyserial to send/receive custom serial messages.What's Next?
Board working? Here's where to go from here.
HC-SR04 Ultrasonic Sensor
Wire up a distance sensor and measure objects from 2cm to 400cm — perfect for obstacle-avoiding projects.
Serial Monitor Deep Dive
Master the built-in Serial Monitor to print values, debug code, and communicate with sensors in real time.
Arduino Project Hub
Thousands of beginner-to-advanced community projects — sensors, displays, motors, IoT, and more.
Arduino Language Reference
Official documentation for every function, variable type, and constant in the Arduino language.